TECH
[Ubuntu] Let’s Encrypt 를 사용하여 무료로 SSL 사이트를 구축하는 방법
중요 사항 : (2020년 1월 15일에 추가됨.) ACMEv2 관련 사항입니다.
과거에 Ubuntu 운영체제를 설치하였고, 운영체제 소프트웨어를 업데이트 하지 않았으면 영향을 받습니다. ACMEv1 은 2020년 6월 1일부터 사용할 수 없습니다.
/var/log/letsencrypt/letsencrypt.log 를 살펴보면 나의 서버가 어떤 버전을 사용하여 SSL 인증서를 발급받는지 알 수 있습니다.
조치 방법 :
letsencrypt --version
을 입력한 후에 버전이 0.27.0 이 아니면
apt update, apt upgrade 를 진행합니다. 조치가 끝났습니다.
테스트 :
1. /etc/letsencrypt/renewal/ 위치에 어느 도메인의 재발급(renewal) 기간을 90일로 강제 설정합니다. (즉, 무조건 리뉴얼됨)
# renew_before_expiry = 30 days 를 renew_before_expiry = 90 days 로 변경.
letsencrypt renew
를 통해 재발급(renewal) 합니다.
2. 위의 letsencrypt.log 및 renewal 파일을 살펴봅니다.
3. renew_before_expiry 를 주석처리(#)하거나 30일로 변경합니다. (즉, 원상복귀)
본문 글 시작 >
웹은 계속 발전하고 있으며, 여러 새로운 기술이 끊임 없이 등장하고 있다.
이 글에서는 웹 기술 중 하나인 SSL (Secure Socket Layer) 에 대해서 이야기 해 보고자 한다.
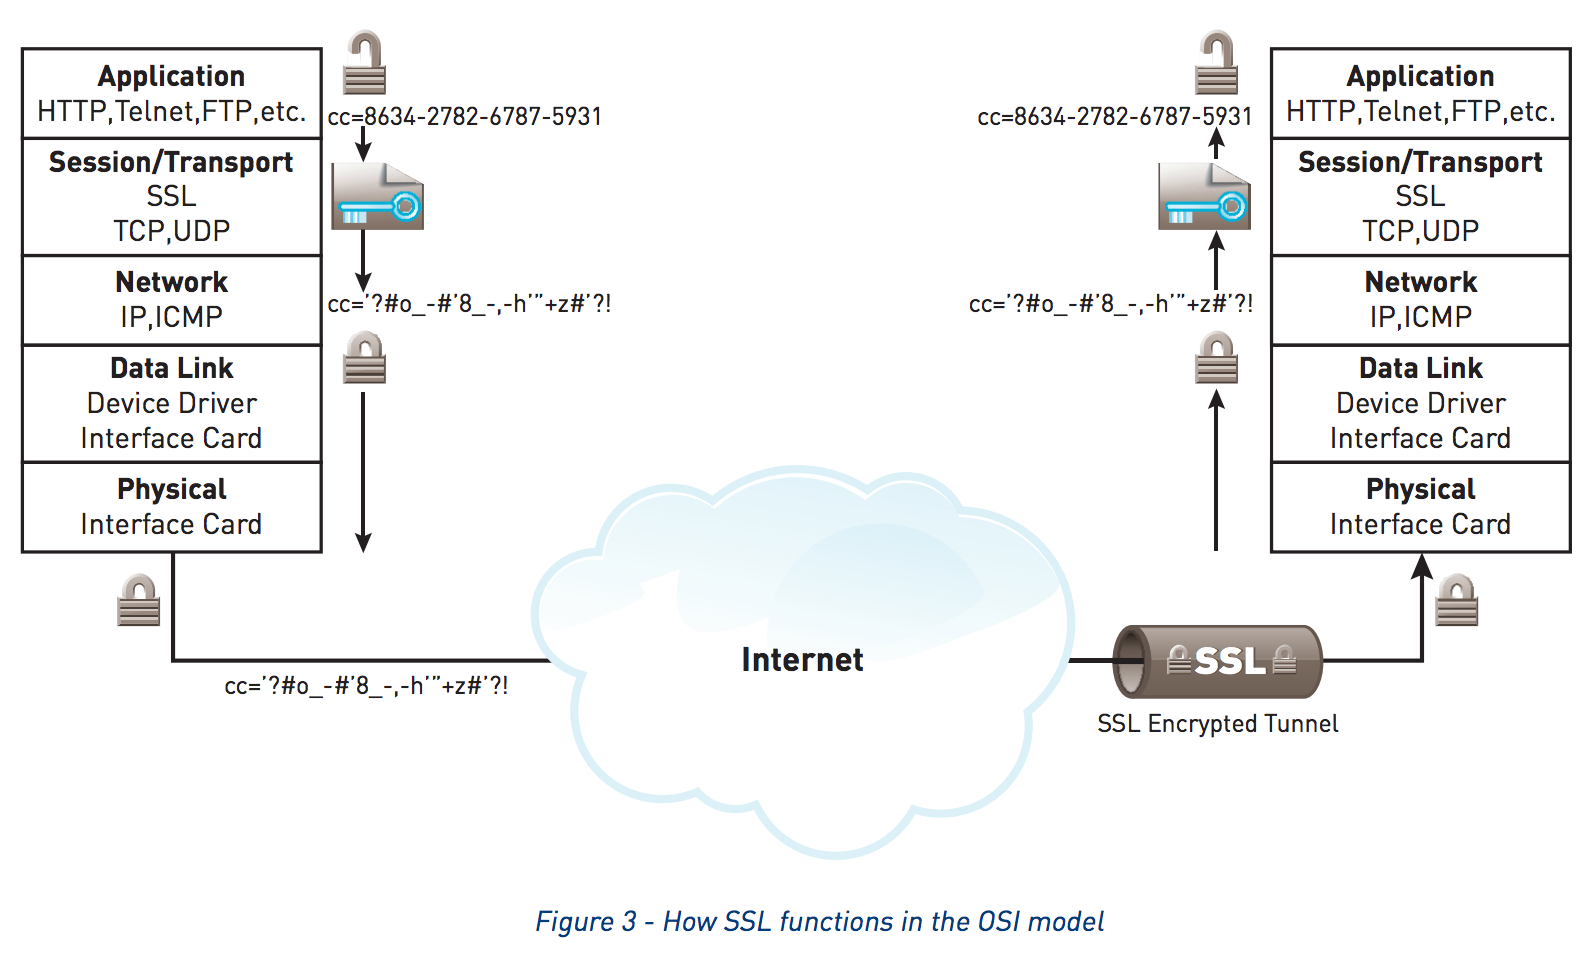
< 그림 : OSI Model 에서 SSL 의 위치 >
정확히 말해서 SSL 은 전송계층과 (Transport Layer) 응용계층 (Application Layer) 사이에서 동작한다. Transport 에서 패킷을 받으면 -> SSL 에서 패킷의 암호를 해독하고 -> Application 에게 전달하는 것이다.
SSL 을 세션계층(Layer 5), 표현계층(Layer 6)으로 분류하는 사람도 있고, 응용계층(Layer 7)으로 분류하는 사람도 있다. 나름대로 주장에 대한 근거가 일리 있으니 여기서는 따로 정확히 분류하지는 않겠다. 확실한건 Transport(Layer 4) 와 Application(Layer 7) 의 사이라는 것.
I) 어떻게 SSL 은 암호화 통신을 하는가?
– 쉽게 말하자면 SSL 은 “보안인증서” 라고 말할 수 있다.
– 사람으로 비유하자면 보안인증서는 암호화코드가 내장된 주민등록증이라고 볼 수 있다.
요즘 대부분의 편의점이나 술집에서는 주민등록증 진위여부 판독기를 가지고 있다.
– 암호학에서 “비대칭키 암호화 방식” 이라는 것이 있다. 어떤 문자를 A 로 암호화하면 B 로만 해독할 수 있는 것이다.
일반적으로 암호화에 사용하는 것을 “암호화키” 라고 부르며 이것은 암호통신에서 공개되기 때문에 “공개키” 또는 “공개 암호화키”, “Public Key” 라고도 부른다.
참조 (RSA_암호) : https://ko.wikipedia.org/wiki/RSA_%EC%95%94%ED%98%B8
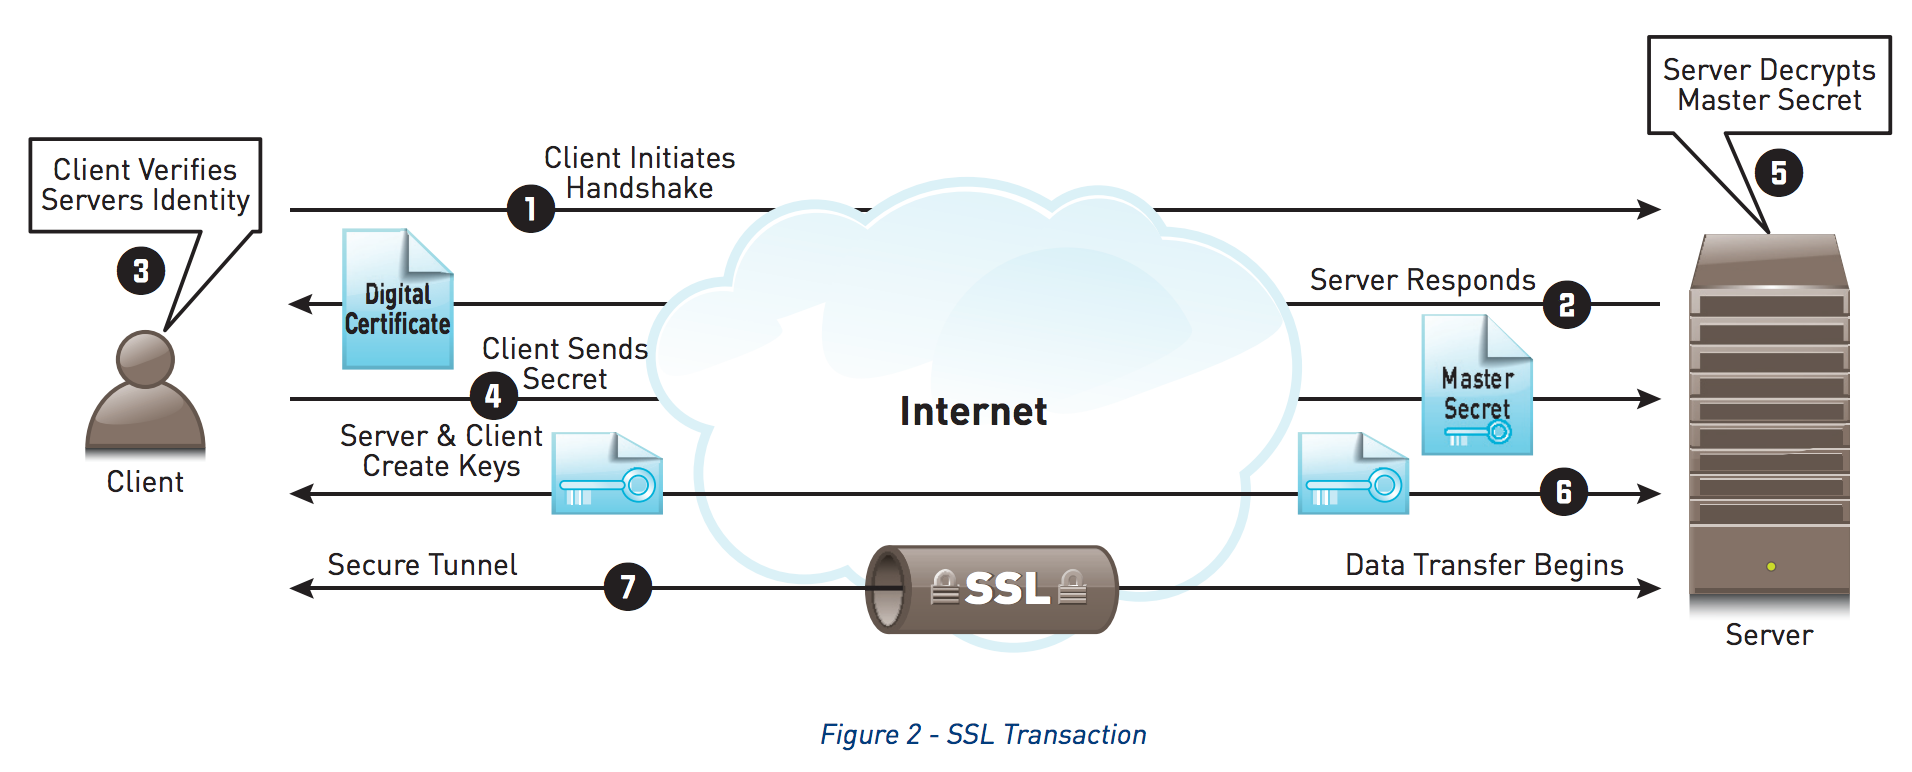
[1] 클라이언트가 서버에 접속한다.
[2] 서버가 보안인증서를 제공한다.
[3] 클라이언트가 서버가 제출한 보안인증서의 유효성을 파악한다. 최상위 발급 기관과 통신하여 유효성을 확인한다. (최상위 발급기관은 운영체제 또는 웹브라우저에 미리 정의되어 있다.)
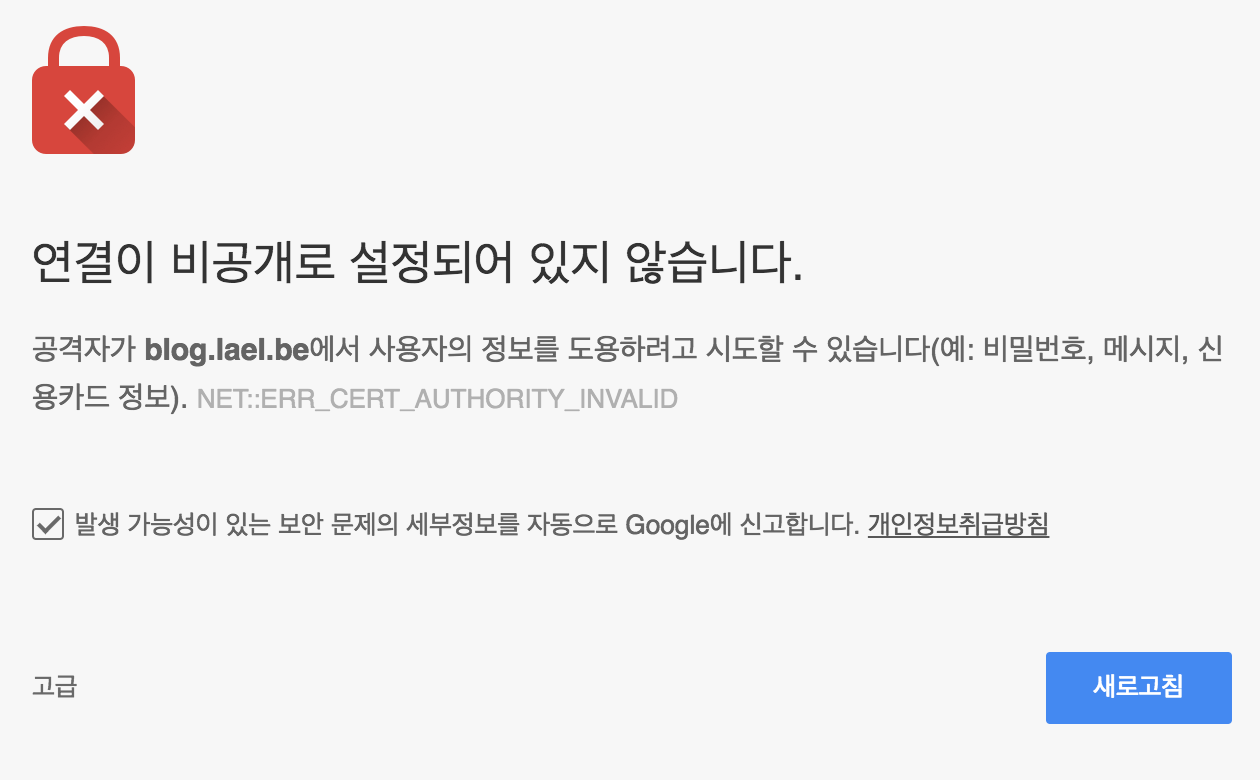
< 그림 : 서버에서 제공한 인증서가 유효하지 않다면 클라이언트는 검증오류로 인해 통신을 중단한다 >
[4] 보안인증서가 유효하면 인증서에 쓰여져 있는 공개 암호화키 A 를 사용하여 클라이언트 자신의 공개 암호화키 C 를 암호화 하여 전송한다.
[5] 서버는 전송된 암호화 구문을 자신만 가지고 있는 해독키(개인 비밀키) B 를 통해서 해독한다.
[6] 해독한 메세지가 유효한 요청이고 클라이언트의 공개 암호화키 C 를 포함하고 있다면 암호화키 C 를 사용하여 잘 받았다는 메세지를 암호화해서 응답한다.
[7] 클라이언트는 자신만 가지고 있는 해독키(개인 비밀키) D 를 통해서 해독한다. 서버에서 받은 응답 메시지가 유효하다면 클라이언트는 A 를 통해 암호화해서 메세지를 보내고, 서버는 C 를 통해 암호화해서 메세지를 보낸다. A키로 암호화된 메세지는 B키로만 해독이 가능하고, C키로 암호화된 메세지는 D키로만 해독이 가능하므로 서로 종단간(End-to-End) 암호화 통신이 성립하는 것이다.
SSL이 적용된 사이트는 “종단간 암호화” 가 적용되기 때문에 중간 패킷 감청으로부터 안전하다. (해독키가 없으므로 메세지 해석이 불가능.)
보안인증서(SSL) 최상위 발급기관은 매우 많으며, 전세계 점유율은 다음 표와 같다.
참조 : https://en.wikipedia.org/wiki/Certificate_authority
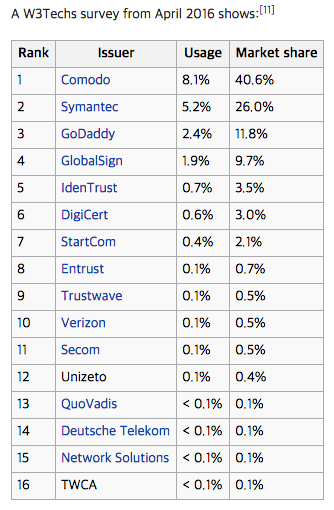
< 그림 : World SSL Issuer Market Share >
최상위 발급기관중 하나인 Let’s Encrypt 를 사용하여 SSL 을 발급받아 사이트에 적용하는 방법을 설명하겠다.
Let’s Encrypt 는 점유율 0.1% 미만의 인증기관이다.(점유율이 매우 낮음) 하지만 발급절차가 간단하고, 무료이기 때문에 점유율이 점차 늘어나지 않을까 싶다.
Let’s Encrypt의 점유율 (Market Share) : https://w3techs.com/technologies/details/sc-letsencrypt/all/all
II) SSL 발급 및 적용 방법
암호화 통신 이론에 대해서 알아보았으니 이제 실제로 적용을 해보도록 하자.
인증서 발급 프로그램을 서버에 설치해야한다.
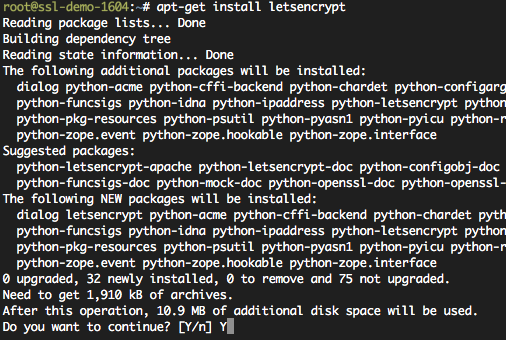
Let’s Encrypt 는 Ubuntu 16.04 LTS 에서 기본패키지로 추가되었다. 따라서 쉽게 설치할 수 있다.
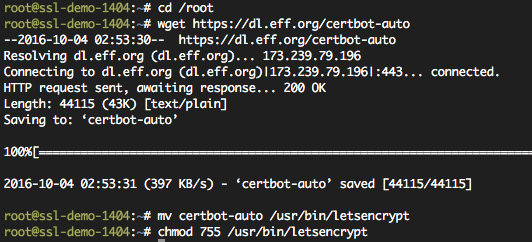
반면 Ubuntu 14.04 LTS 에서는 기본패키지가 아니기 때문에 몇 줄 더 입력해야 한다.
발급, 설치, 적용 방법은 다음과 같다.
모든 단계는 Linux root 계정으로 진행한다.
1. 인증서 발급 프로그램 설치하기
– Ubuntu 14.04 일 경우
# cd /root
# wget https://dl.eff.org/certbot-auto
# mv certbot-auto /usr/bin/letsencrypt
# chmod 755 /usr/bin/letsencrypt
– Ubuntu 16.04 일 경우 (또는 그 이후 버전, 18.04 등)
# apt-get install letsencrypt
2. 인증서 발급 프로그램을 사용하여 인증서 발급받기
인증서는 Domain Control Validation 을 거쳐야 발급받을 수 있다. 당신이 도메인이 없다면 인증서를 발급받을 수 없다.
Domain Control Validation 은 주로 다음의 3가지 방법으로 이루어진다.
참고 : Domain Control Validation 의 3가지 방법 (https://docs.gandi.net/en/ssl/common_operations/dcv.html)
Let’s Encrypt 는 위의 도메인 인증방법 중 3번째인 Validation by file 를 사용하여 인증한다. (최근 Let’s Encrypt 에서 Validation by DNS 방식도 지원하도록 변경되었다. 하지만 이 방법은 이 글에서 다루지 않겠다.)
따라서 먼저 해당 도메인에 대한 HTTP 접속이 가능해야 한다.
서버를 처음 세팅하는 경우 HTTP 를 먼저 설정한 다음에 -> 인증서를 발급받고 -> HTTPS 를 추가 설정하는 단계를 거쳐야 할 것이다.
이미 HTTPS 를 사용하고 있을 경우 -> 인증서를 발급받고 -> HTTPS 인증서 교체 하는 단계를 거쳐야 할 것이다.
예제
명령 실행시 1회에 한해 인증관련 프로그램이 추가설치될 수 있다.
*예제 1 :
letsencrypt certonly --webroot --webroot-path=/home/myuser1/www -d myuser1.com
*예제 2 :
letsencrypt certonly --webroot --webroot-path=/home/myuser2/www -d myuser2.com
*예제 3 : * 널리 사용됨 (원본 도메인과 www 도메인 동시인증)
letsencrypt certonly --webroot --webroot-path=/home/myuser3/www -d myuser3.com -d www.myuser3.com
*예제 4 :
letsencrypt certonly --webroot --webroot-path=/home/myuser4/www -d myuser4.com -d www.myuser4.com -d blog.myuser4.com -d myhome.myuser4.com
* 명령어 설명
-d 는 도메인명을 지정하면 된다. 최대 100개의 도메인 이름을 지정할 수 있다. (한 인증서가 서로다른 100개의 도메인 인증을 할 수 있음) 일반적으로는 기본도메인과 www 도메인 두개를 지정한다.
-webroot 는 웹인증을 받을 것이라는 것이다. 외부 인증프로그램이 -d 에 지정된 도메인 사이트에 접속한다.
-webroot-path 는 웹루트의 경로이다. 보통 index 페이지가 위치하는 경로이다. 인증 프로그램이 이 경로에 임시 랜덤 파일을 생성하고, 외부 인증프로그램이 이 파일을 접근할 수 있다면 Domain Validation 이 되는 것이다.
명령이 실행되면 다음 화면이 표시된다.
비상연락처 : 인증에 문제가 생겼거나, 인증서 만료기간이 가까웠을때 갱신 알림 메일을 수신할 주소이다.
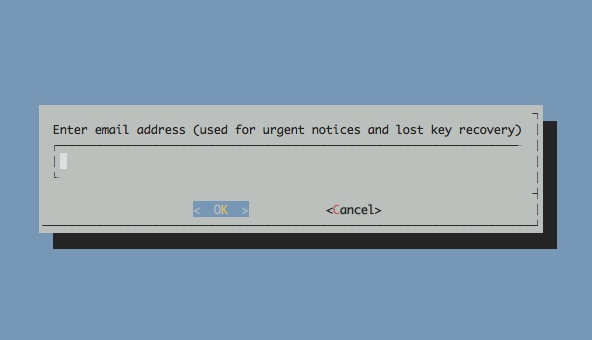
약관에 동의하면 즉시 인증서가 발급된다.
발급에 실패했다면 외부 접속이 문제가 있거나 -webroot-path 를 올바르게 입력하지 않았을 것이다.
Let’s Encrypt 인증 오류 발생시 다음의 사항을 확인한다.
다음의 문서로 이동해서
# Allow Lets Encrypt Domain Validation Program
설정이 되어있는지 확인하여라.
Apache 사용자의 경우 : https://blog.lael.be/post/73#apache2.conf
Nginx 사용자의 경우 : https://blog.lael.be/post/2600#myuser1.conf
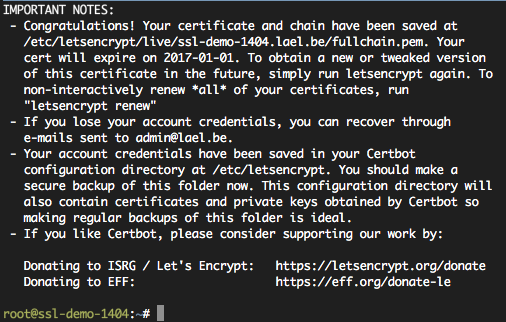
– Ubuntu 14.04 발급성공
– Ubuntu 16.04 발급성공
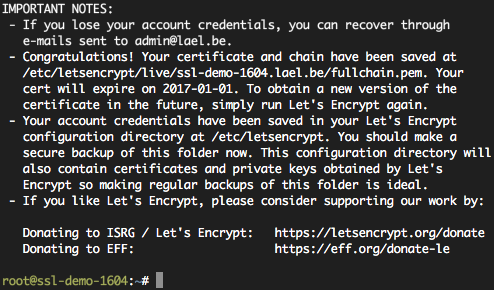
/etc/letsencrypt/live/[인증서명]/ 위치에 발급된다.
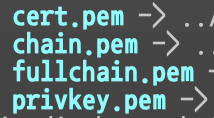
cert.pem – 인증서 파일
chain.pem – 인증서 발급자 파일
fullchain.pem – cert.pem 과 chain.pen 을 하나로 합쳐놓은 파일
privkey.pem – 인증암호를 해독하는 개인키
#TIP : 이때 발급된 인증서 파일은 웹서버 인증서(HTTPS), 메일서버 인증서(IMAPS, POP3S, SMTPS), VPN서버 인증서(SSTP), 윈도우 원격데스크톱 인증서(MSTSC), Gitlab, OwnCloud 등의 용도로 사용 할 수 있다. (인증서 만료시 갱신해야하는 번거로움이 생기겠지만..)

Apache2 서버에서는 cert.pem, chain.pem, privkey.pem 을 사용합니다.
Nginx 서버에서는 fullchain.pem, privkey.pem 을 사용합니다.
Apache2 적용방법 : https://blog.lael.be/post/73 13번 항목을 참조한다.
| 123456789 | SSLEngine onSSLProtocol all -SSLv2 -SSLv3SSLCipherSuite ECDHE-RSA-AES128-GCM-SHA256:ECDHE-ECDSA-AES128-GCM-SHA256:ECDHE-RSA-AES256-GCM-SHA384:ECDHE-ECDSA-AES256-GCM-SHA384:DHE-RSA-AES128-GCM-SHA256:DHE-DSS-AES128-GCM-SHA256:kEDH+AESGCM:ECDHE-RSA-AES128-SHA256:ECDHE-ECDSA-AES128-SHA256:ECDHE-RSA-AES128-SHA:ECDHE-ECDSA-AES128-SHA:ECDHE-RSA-AES256-SHA384:ECDHE-ECDSA-AES256-SHA384:ECDHE-RSA-AES256-SHA:ECDHE-ECDSA-AES256-SHA:DHE-RSA-AES128-SHA256:DHE-RSA-AES128-SHA:DHE-DSS-AES128-SHA256:DHE-RSA-AES256-SHA256:DHE-DSS-AES256-SHA:DHE-RSA-AES256-SHA:AES128-GCM-SHA256:AES256-GCM-SHA384:AES128-SHA256:AES256-SHA256:AES128-SHA:AES256-SHA:AES:CAMELLIA:DES-CBC3-SHA:!aNULL:!eNULL:!EXPORT:!DES:!RC4:!MD5:!PSK:!aECDH:!EDH-DSS-DES-CBC3-SHA:!EDH-RSA-DES-CBC3-SHA:!KRB5-DES-CBC3-SHA SSLHonorCipherOrder on SSLCertificateFile "/etc/letsencrypt/live/mysitename.com/cert.pem"SSLCertificateKeyFile "/etc/letsencrypt/live/mysitename.com/privkey.pem"SSLCertificateChainFile "/etc/letsencrypt/live/mysitename.com/chain.pem" |
Nginx 적용방법 : https://blog.lael.be/post/2600 16번 항목을 참조한다.
dhparam.pem 파일은 한번만 생성하면 된다. (중복하여 생성해도 문제가 발생하지는 않음)
# openssl dhparam -out /etc/ssl/certs/dhparam.pem 2048
| 1234567891011 | listen 443 ssl http2;server_name ssl-demo-1604.lael.be;root /home/ssl-demo-1604/www;client_max_body_size 10M; ssl_certificate "/etc/letsencrypt/live/mysitename.com/fullchain.pem";ssl_certificate_key "/etc/letsencrypt/live/mysitename.com/privkey.pem";ssl_dhparam "/etc/ssl/certs/dhparam.pem"; # Enable HSTS. This forces SSL on clients that respect it, most modern browsers. The includeSubDomains flag is optional.add_header Strict-Transport-Security "max-age=31536000"; |
3. 인증서 발급 프로그램을 통해 인증서 갱신하기
Let’s Encrypt 는 3개월짜리 인증서를 발급해준다.
즉 인증서를 3개월마다 주기적으로 갱신(renewal)해 주어야한다. 갱신은 만료일 기준 1개월전부터 할 수 있다.
# letsencrypt renew
갱신할 인증서가 있다면 자동으로 갱신 작업을 진행한다.
갱신 작업에는 인증서의 재발급이 이루어진다. (renew = reissue)
동일한 도메인에 대해서, 동일한 인증기관이 여러개의 인증서를 발급할 수도 있다. (모두 유효)
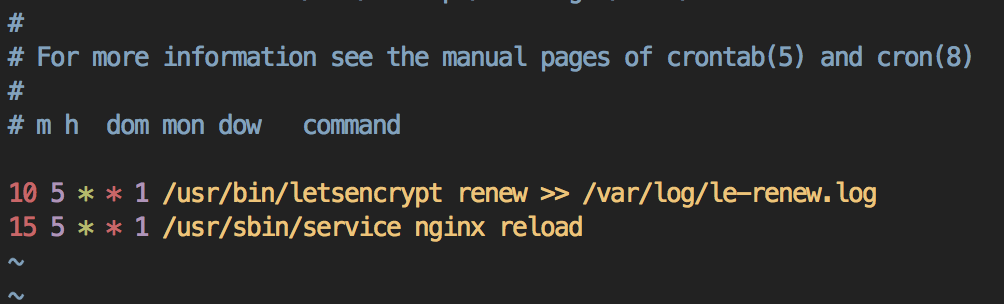
4. 인증서 갱신 프로그램 주기적으로 실행하기
큰 부하가 일어나는 것이 아니기 때문에 아무때나 실행해 주어도 큰 문제가 없다.
매주 월요일 새벽 5시 10분에 인증서 갱신을, 매주 월요일 새벽 5시 15분에 웹서버 프로그램 변경사항 적용을 실행하도록 설정한다.
# crontab -e
혹시나 에디터 선택문구가 출력된다면 3번을 누르세요. (재선택 명령어 : select-editor)
– Apache2 웹서버를 사용하는 경우
10 5 * * 1 /usr/bin/letsencrypt renew >> /var/log/le-renew.log
15 5 * * 1 /usr/sbin/service apache2 reload

– Nginx 웹서버를 사용하는 경우
10 5 * * 1 /usr/bin/letsencrypt renew >> /var/log/le-renew.log
15 5 * * 1 /usr/sbin/service nginx reload
참조 : https://www.ssl.com/article/dv-ov-and-ev-certificates/
참조 : https://community.letsencrypt.org/t/which-browsers-and-operating-systems-support-lets-encrypt/4394
인증서 관련 상황 및 대처 방법 예시
현재 서버에서 사용중인 인증서 목록 보기
# cd /etc/letsencrypt/live
# ls
일부 서버 인증서 삭제
반드시 위의 인증서 목록 보기를 통해 인증서 이름을 알아두어야 한다.
현재 사용중인 인증서 취소(revoke)
# letsencrypt revoke --cert-path /etc/letsencrypt/archive/my-examplesite.com/cert1.pem
보통 revoke 는 거의 하지 않는다. 사용 안하는 인증서는 그냥 그대로 두어서 만료 시킨다.
다만, 인증서 파일 및 인증서 키가 유출되었고, 도메인 제어 권한에 문제가 있을때, 특수한 상황일 때, revoke를 진행하곤 한다.
갱신 목록에서 제거
이 목록에서 지우면 renew 를 하지 않는다.
# cd /etc/letsencrypt/renewal/
# ls
설정파일을 수동으로 선택해서 지운다. (항상 지우는 명령을 실행할 땐 5초동안 고민한 뒤에 엔터를 눌러라.)
기존에 발급받았었던 파일 삭제 (옵션)
찌꺼기 파일인데, 지워도 되고, 안지워도 되고. 아래 위치에서 도메인 폴더를 선택하여, 삭제하면 된다.
# /etc/letsencrypt/live/
# /etc/letsencrypt/renewal/Read More
ssl 인증서 발급 중 발생한 에러 해결 방법
0. ssl 인증서 발급 커맨드
# ssl 인증서 발급 커맨드 예시
./certbot-auto certonly --standalone -d test.@@@@@@@@@@@@@@@@@@.co.kr
( 관련 추가 정보 필요시 우측 링크 참조 : https://growingsaja.tistory.com/426 )
1. ssl 인증서 발급 실패 로그 확인
...

Waiting for verification...
Challenge failed for domain test.@@@@@@@@@@@@@@@@@.co.kr
http-01 challenge for test.@@@@@@@@@@@@@@@@@.co.kr
Cleaning up challenges
Some challenges have failed.

IMPORTANT NOTES:
 - The following errors were reported by the server:

   Domain: test.@@@@@@@@@@@@@@@@@.co.kr
   Type:   connection
   Detail: Fetching
   http://test.@@@@@@@@@@@@@@@@@.co.kr/.well-known/acme-challenge/0qiQf-ACMnRm4Ff1cHs7_paH99hxKpfpnV78wWiVDfs:
   Timeout during connect (likely firewall problem)

   To fix these errors, please make sure that your domain name was
   entered correctly and the DNS A/AAAA record(s) for that domain
   contain(s) the right IP address. Additionally, please check that
   your computer has a publicly routable IP address and that no
   firewalls are preventing the server from communicating with the
   client. If you're using the webroot plugin, you should also verify
   that you are serving files from the webroot path you provided.
 - Your account credentials have been saved in your Certbot
   configuration directory at /etc/letsencrypt. You should make a
   secure backup of this folder now. This configuration directory will
   also contain certificates and private keys obtained by Certbot so
   making regular backups of this folder is ideal.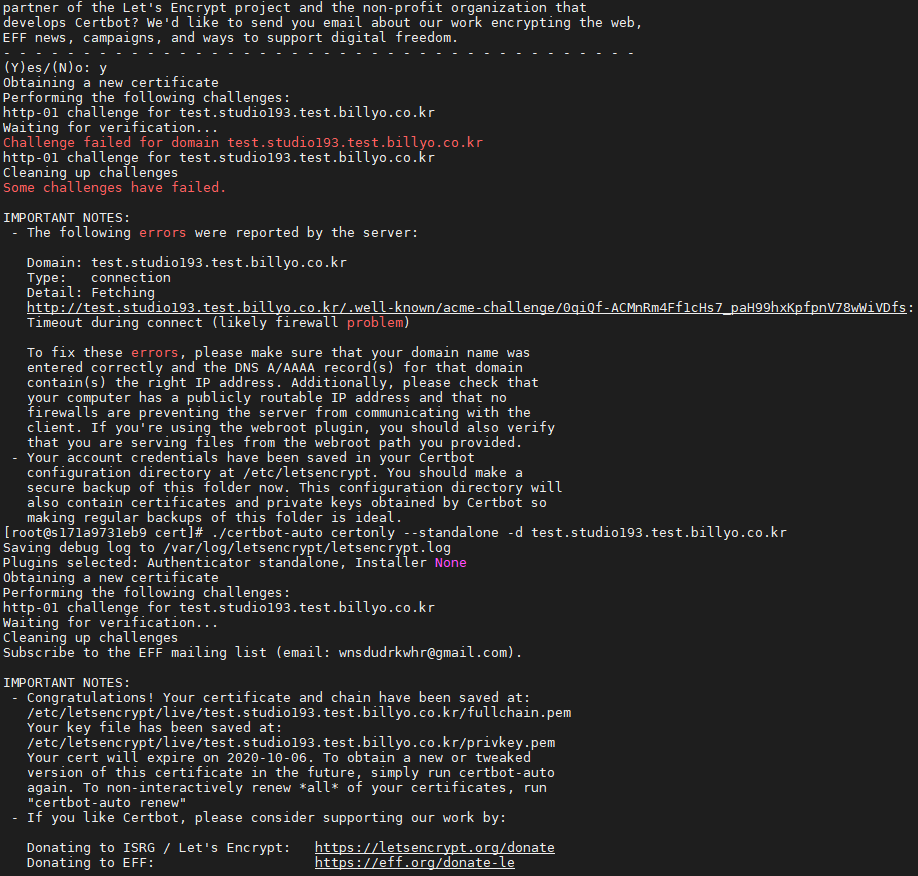
읽어보면, 방화벽 문제일 것으로 보인다는 내용을 확인할 수 있습니다.
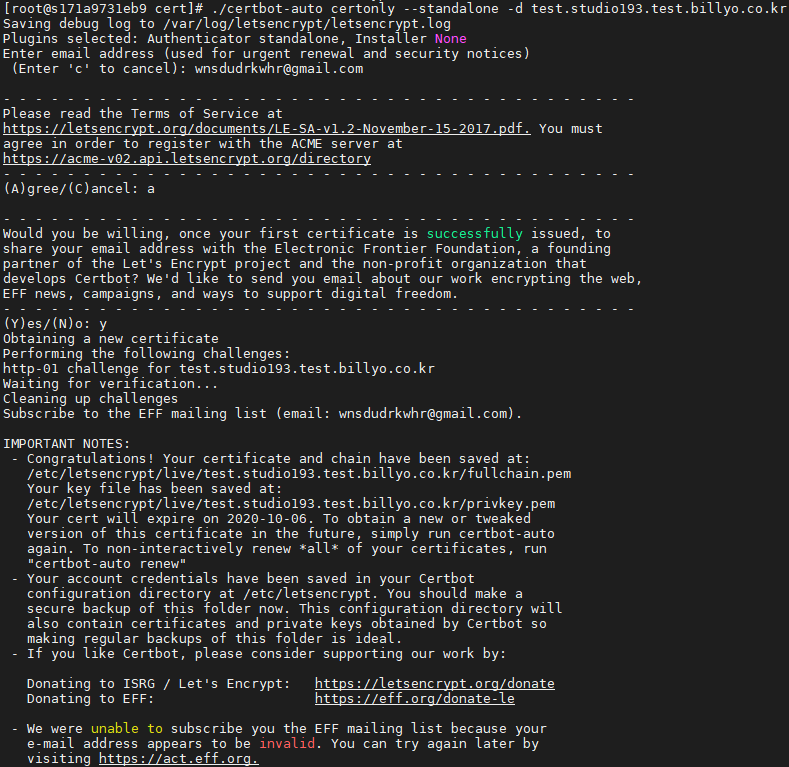
2. 방화벽에 80 포트 open
추측으로는, http://test.@@@@@@@.co.kr 쪽으로 로 요청한 부분이 연결시도 중 timeout 되었다는 것으로 보아 80 포트를 열어주면 해결이 될 것이라고 추측하여 작업했습니다.

3. ssl 인증서 정상 발급
# ssl 인증서 발급 커맨드 예시
./certbot-auto certonly --standalone -d test.@@@@@@@@@@@@@@@@@@.co.kr
80 port를 open해준 후에는 정상적으로 ssl 인증서가 발급되었습니다.
DNS TXT Record 로 Let’s Encrypt SSL 인증서 발급 받기
새로운 서버용으로 let’s encrypt 에서 SSL/HTTPS 용 인증서를 발급받는 중에 다음과 같은 에러를 만났습니다.
Failed authorization procedure. new.lesstif.com (http-01): urn:ietf:params:acme:error:connection :: The server could not connect to the client to verify the domain :: Fetching http://new.lesstif.com/.well-known/acme-challenge/NXqaYCws-a46TbVqRqOvLUNWz6LJ3AsMVvTo4RG0e3w: Timeout during connect (likely firewall problem)

IMPORTANT NOTES:
 - The following errors were reported by the server:

   Domain: new.lesstif.com
   Type:   connection
   Detail: Fetching
   http://new.lesstif.com/.well-known/acme-challenge/NXqaYCws-a46TbVqRqOvLUNWz6LJ3AsMVvTo4RG0e3w:
   Timeout during connect (likely firewall problem)

   To fix these errors, please make sure that your domain name was
   entered correctly and the DNS A/AAAA record(s) for that domain
   contain(s) the right IP address. Additionally, please check that
   your computer has a publicly routable IP address and that no
   firewalls are preventing the server from communicating with the
   client. If you're using the webroot plugin, you should also verify
that you are serving files from the webroot path you provided.80 포트에 대해 방화벽도 public 으로 열려 있고 검색해 보았지만 도저히 원인을 찾을 수가 없어서 TXT 레코드를 도메인에 추가해서 소유를 인증받은 후에 SSL 인증서를 발급받기로 정했고 그 방법을 정리해 봅니다.
TXT 레코드 요청
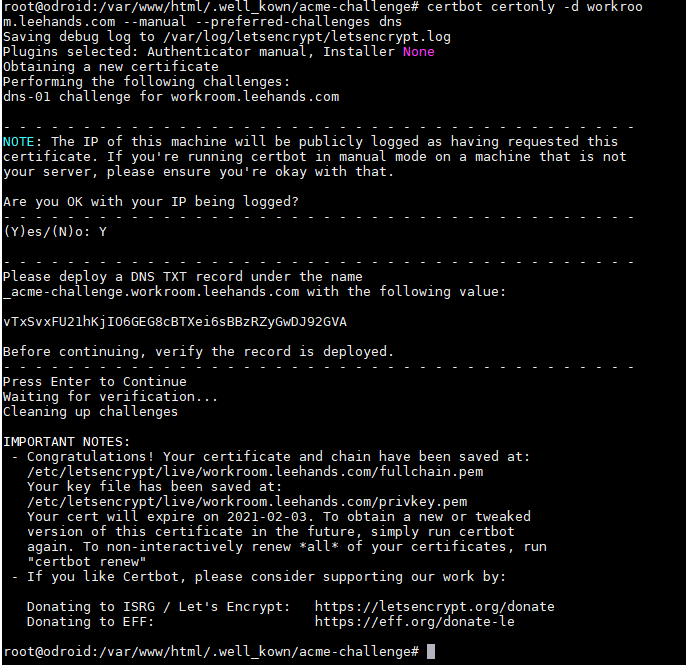
- certbot 을 실행할 때 –manual 옵션과 –preferred-challenges dns 을 주어서 실행합니다.
certbot certonly -d new.lesstif.com --manual --preferred-challenges dnsCopy - IP 로깅을 허용하겠냐고 묻는 화면에서 Y 를 입력합니다.
- - - - - - - - - - - - - - - - - - - - - - - - - - - - - - - - - - - - - - - -
NOTE: The IP of this machine will be publicly logged as having requested this
certificate. If you're running certbot in manual mode on a machine that is not
your server, please ensure you're okay with that.

Are you OK with your IP being logged?
- - - - - - - - - - - - - - - - - - - - - - - - - - - - - - - - - - - - - - - -
(Y)es/(N)o: Y
Copy - TXT 에 등록할 내용이 출력되면 복사해 둡니다.
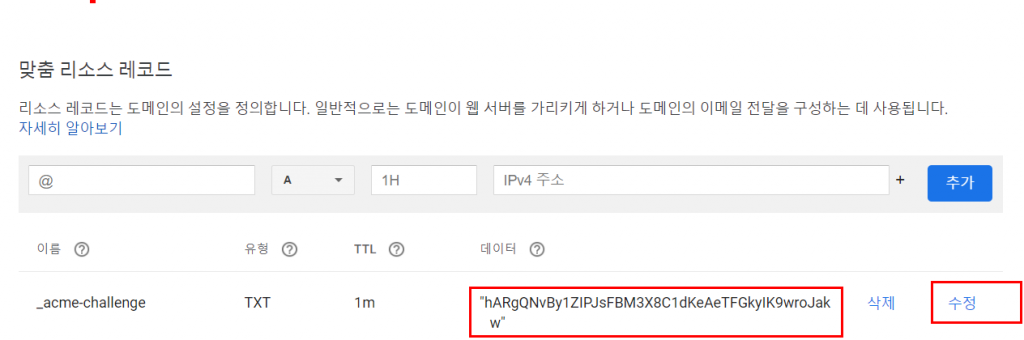
Please deploy a DNS TXT record under the name
_acme-challenge.new.lesstif.com with the following value:

slqQSBrs4rToROM7LyEeBVvI92YXi3JJ-RK6S5OBKNc

Before continuing, verify the record is deployed.
- - - - - - - - - - - - - - - - - - - - - - - - - - - - - - - - - - - - - - - -
Press Enter to Continue
Copy - DNS 서버에 TXT 레코드를 등록합니다. DNS 서비스 제공자에 따라 화면이 다를 수 있습니다.
- 새로운 터미널을 열고 정상적으로 등록됐는지 확인합니다.
$ nslookup -q=TXT _acme-challenge.new.lesstif.com


Server:         168.126.63.1
Address:        168.126.63.1#53

Non-authoritative answer:
_acme-challenge.new.lesstif.com text = "slqQSBrs4rToROM7LyEeBVvI92YXi3JJ-RK6S5OBKNc"

Authoritative answers can be found from:
Copy - 기존 let’s encrypt 발급 터미널로 간 후에 엔터를 입력합니다.
- 정상 발급되었는지 확인하고 웹 서버를 설정합니다.
Waiting for verification...
Cleaning up challenges

IMPORTANT NOTES:
 - Congratulations! Your certificate and chain have been saved at:
   /etc/letsencrypt/live/new.lesstif.com/fullchain.pem
   Your key file has been saved at:
   /etc/letsencrypt/live/new.lesstif.com/privkey.pem
Copy
https://www.lesstif.com/system-admin/dns-txt-record-let-s-encrypt-ssl-59343172.html
Read MoreUbuntu, Apache2 https(ssl) 적용하기
현재 운영중인 서버에 ssl 적용을 위해 여러가지를 알아보았다.
유료로 구입 후 적용하면 되겠지만 구입하지 않고 무료인 방법을 찾아서 적용하였고 해당 방법을 작성해 놓으려고 한다.
내가 사용한 것은 letsencrypt다.
OS : 18.04.2
Server : Apache
Port : 443 (기본포트)
1. git에서 프로젝트를 다운로드 한다. (우분투 경로 어디에서든 관계없음. 나의경우는 홈디렉토리에서 진행)
git clone https://github.com/letsencrypt/letsencrypt2. let’s encrypt 프로젝트로 이동
cd letsencrypt3. let’s encrypt를 실행하여 key 발급
– 이메일주소 : 기간이 만료될 때 메일로 알림이 온다.
– 사용할 도메인주소 : 구입한 도메인, 예를들어 : kkensu.com
sudo ./letsencrypt-auto certonly --manual --email [이메일 주소] -d [사용할 도메인주소]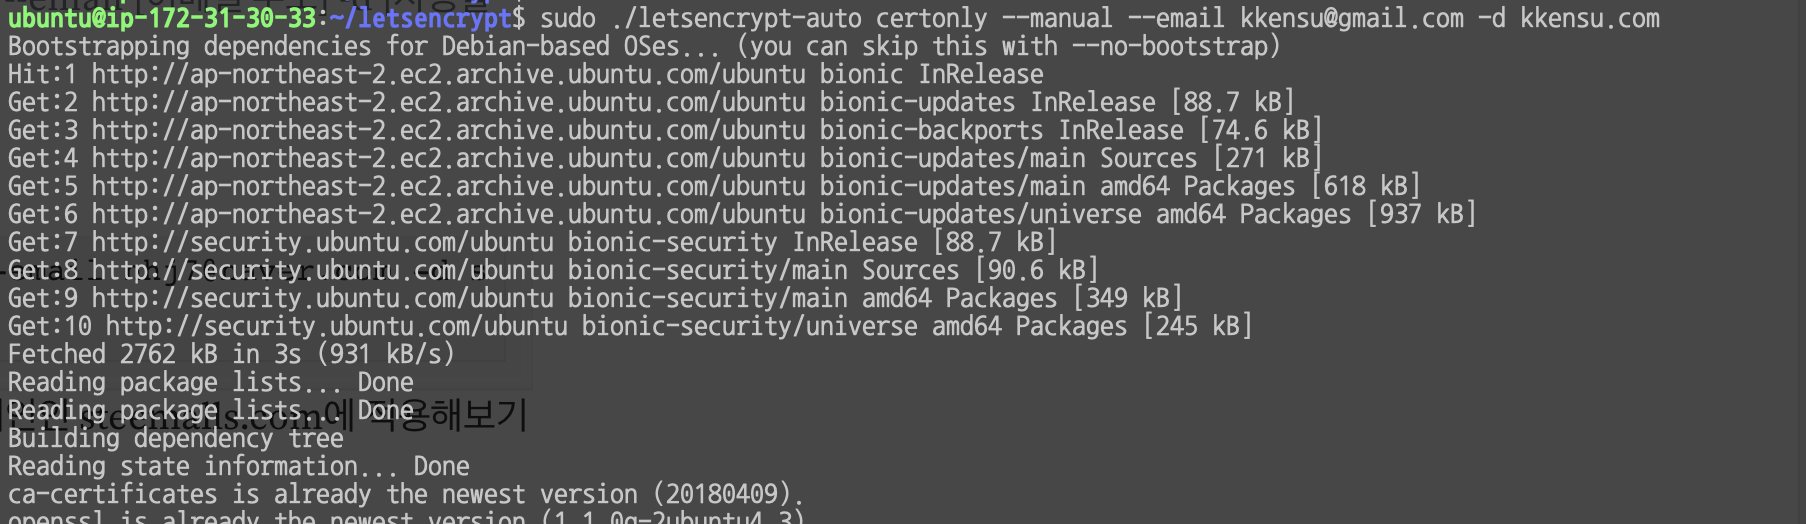
– 필요한 피키지들은 자동으로 받으면서 진행됩니다. 그러면서 아래와 같이 물어보는곳이 나오는데 Agree / Yes / Yes 로 진행하면 Press Enter to Continue 라고 나옵니다. 이 때 엔터를 누르지 말고 잠시 대기해주세요.
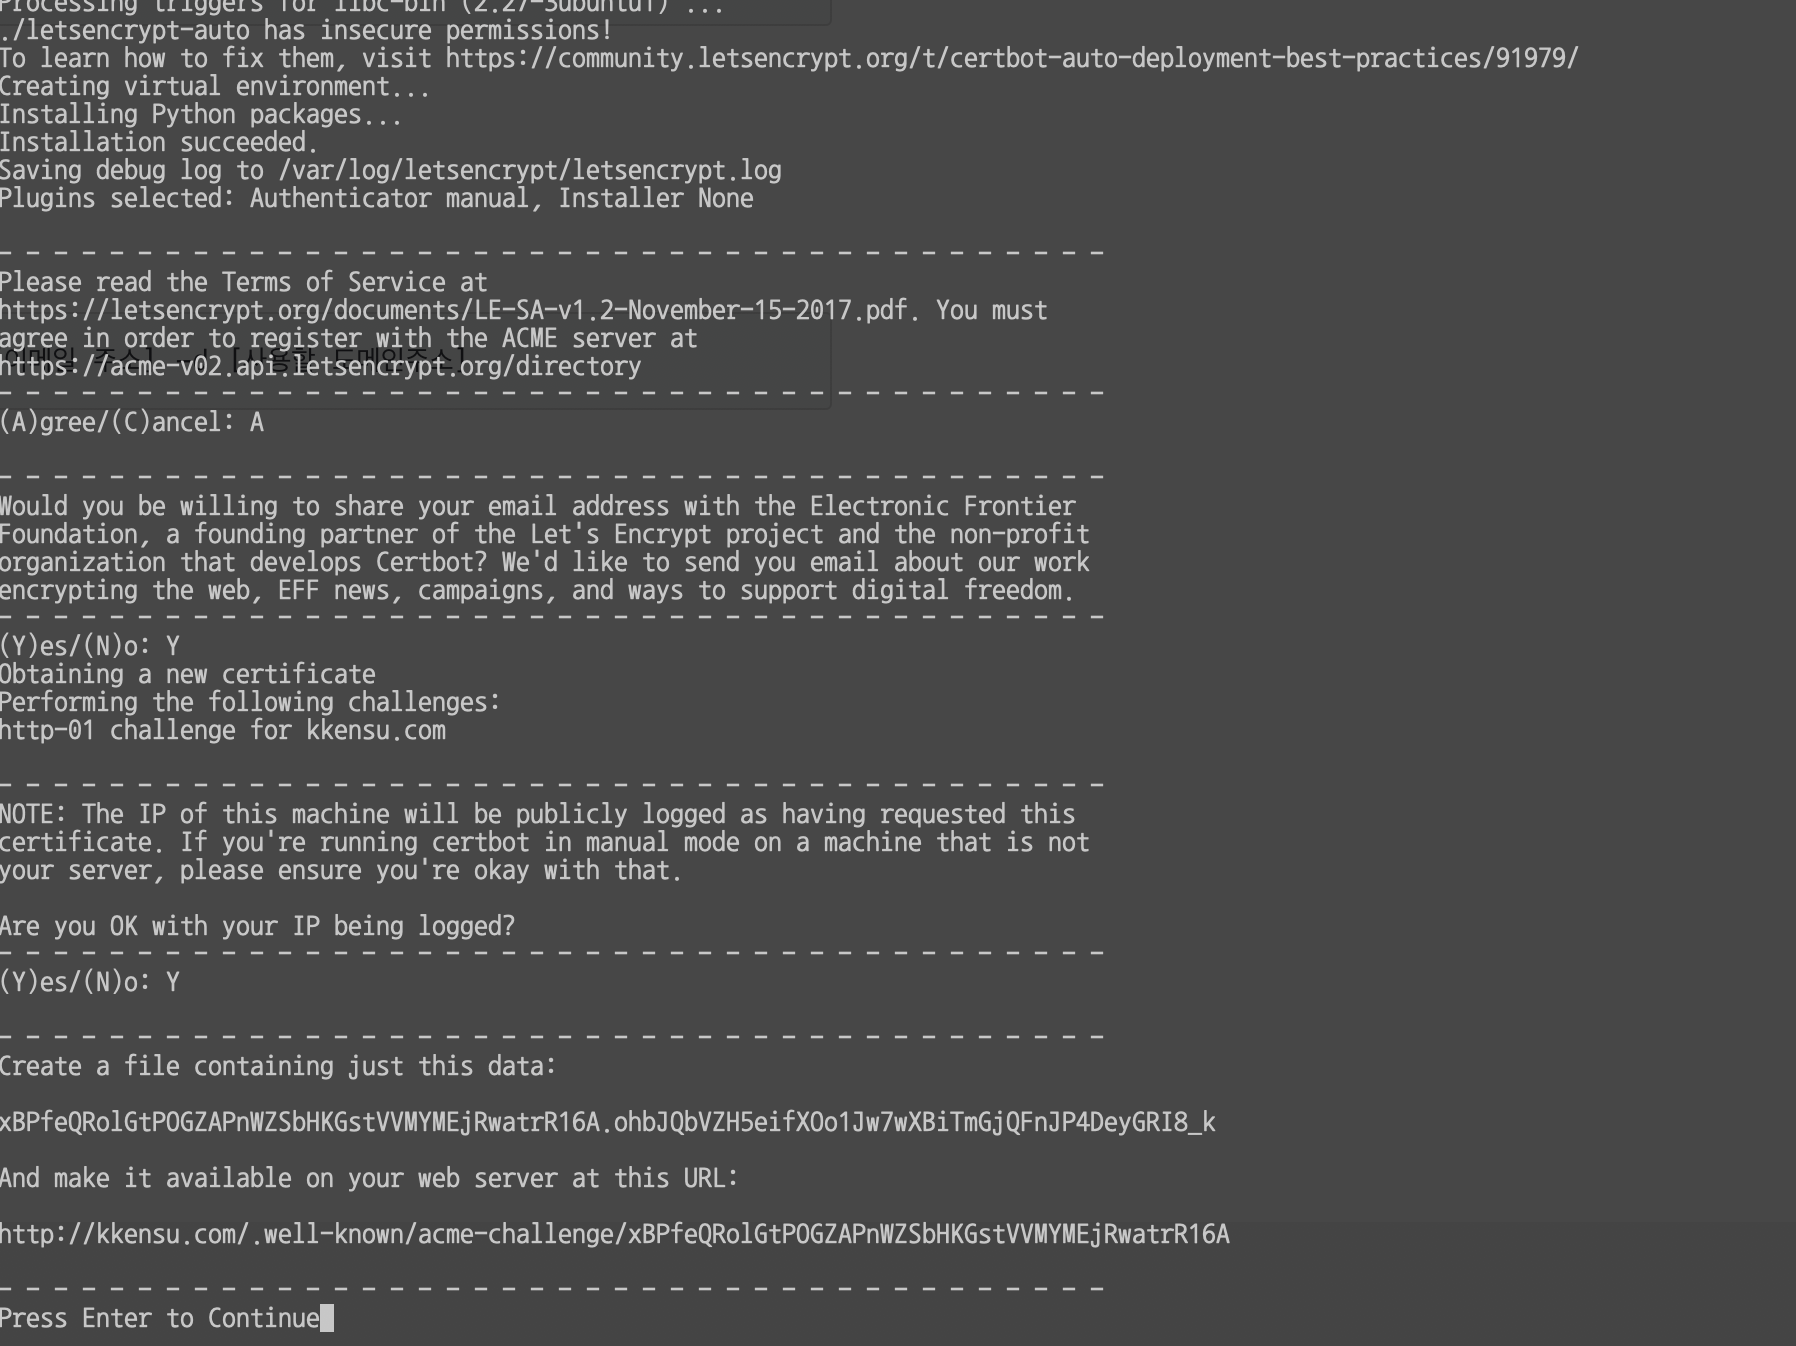
4. 위의 그림과 같은 상태라면 터미널을 하나 더 연후에 아래의 내용을 기입
자신의 서버 root path로 이동 (예 : /var/www/html)

mkdir .well-known

cd .well-known

mkdir acme-challenge

cd acme-challenge

vi xBPfeQRolGtPOGZAPnWZSbHKGstVVMYMEjRwatrR16A

"xBPfeQRolGtPOGZAPnWZSbHKGstVVMYMEjRwatrR16A.ohbJQbVZH5eifXOo1Jw7wXBiTmGjQFnJP4DeyGRI8_k" 입력

큰따옴표는 빼놓고 입력을 했으면 저장 후 종료
5. 4번을 마쳤으면 원래의 터미널로 돌아와서 Enter를 눌러 다음으로 진행
6. 완료
– Congratulations! 라고 나오면서 마무리가 된다.
Press Enter to Continue
Waiting for verification...
Cleaning up challenges

IMPORTANT NOTES:
 - Congratulations! Your certificate and chain have been saved at:
   /etc/letsencrypt/live/kkensu.com/fullchain.pem
   Your key file has been saved at:
   /etc/letsencrypt/live/kkensu.com/privkey.pem
   Your cert will expire on 2019-05-23. To obtain a new or tweaked
   version of this certificate in the future, simply run
   letsencrypt-auto again. To non-interactively renew *all* of your
   certificates, run "letsencrypt-auto renew"
 - If you like Certbot, please consider supporting our work by:

   Donating to ISRG / Let's Encrypt:   https://letsencrypt.org/donate
   Donating to EFF:                    https://eff.org/donate-le
7. /etc/letsencrypt/live/[도메인]/ 디렉토리 안에 pem키 4가지가 존재한다.
8. 아파치에 ssl 키 등록하기
– cd /etc/apache2/sites-available (디렉토리로 이동)
– sudo cp default-ssl.conf kkensu.com-ssl.conf (복사하기)
– sudo vi kkensu.com-ssl.conf
– 아래 내용 입력하여 파일 수정하기
<IfModule mod_ssl.c>
    <VirtualHost *:443> <!-- https 연결이 되지 않는다면 * 부분에 아이피를 넣어준다. x.x.x.x:443 -->
        ServerAdmin kkensu@gmail.com
        ServerName kkensu.com
        ServerAlias kkensu.com

        DocumentRoot /var/www/html

        ErrorLog ${APACHE_LOG_DIR}/error.log
        CustomLog ${APACHE_LOG_DIR}/access.log combined

        SSLEngine on

        SSLCertificateFile  /etc/letsencrypt/live/kkensu.com/cert.pem
        SSLCertificateKeyFile /etc/letsencrypt/live/kkensu.com/privkey.pem
        SSLCertificateChainFile /etc/letsencrypt/live/kkensu.com/chain.pem

        <FilesMatch "\.(cgi|shtml|phtml|php)$">
                SSLOptions +StdEnvVars
        </FilesMatch>
        <Directory /usr/lib/cgi-bin>
                SSLOptions +StdEnvVars
        </Directory>

        </VirtualHost>
</IfModule>
9. kkensu.com 도메인 enable 설정하기
sudo a2enmod ssl <!-- ssl을 사용하겠다고 명시해주는 것 -->

sudo a2ensite kkensu.com-ssl.conf
10. 아파치 재기동
sudo service apache2 restart11. http로 접속하면 https로 이동하도록 Redirect 걸기
<VirtualHost *:80>
     ServerName kkensu.com
     DocumentRoot /var/www/test
     Redirect permanent / https://kkensu.com/
     <Directory /var/www/html/>
        Options Indexes FollowSymLinks MultiViews
        AllowOverride All
     </Directory>
 </VirtualHost>
12. 끝!
Read MoreSSL 인증서 갱신하기(Let’s Encrypt)오류 발생시 대처
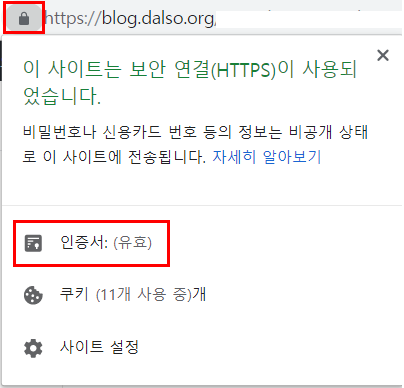
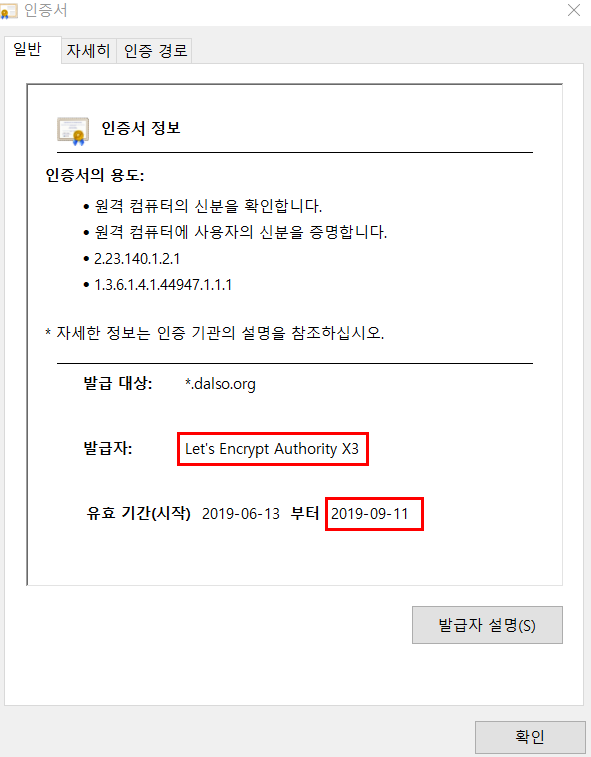
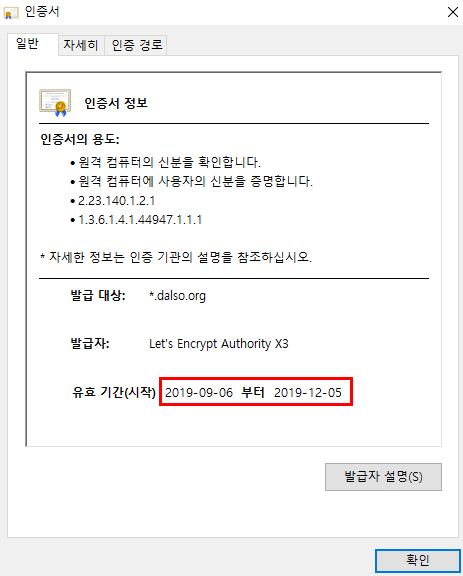
Let’s Encrypt 인증서의 경우 유효기간이 90일 밖에 되지않는다. 인증서의 유효기간을 웹에서 쉽게 확인하는 방법은 주소창에서 자물쇠 버튼을 누르는것이다.
아니면 서버에 들어가서 certbot certificates를 입력
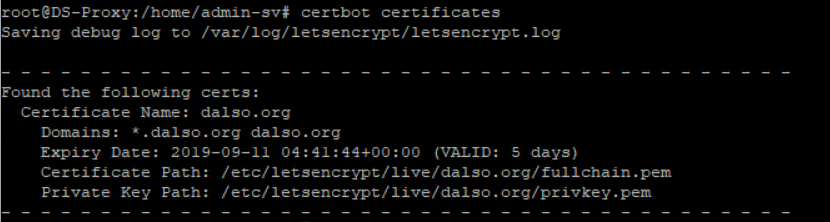
일주일도 안남았으니까 포스팅도 할겸 겸사겸사 업데이트를 진행해보겠다.
먼저 인증서가 깔린 서버에 접속하자. (나같은경우 웹서버가 아닌 프록시 서버에 와일드카드 인증서를 설치했다)
nginx의 도메인에서 아래와 같이 설정해 줬는데 잘 있나 확인해보자.
location ^~ /.well-known/acme-challenge/ {
root /var/www/webroot;
인증서 갱신 명령어는 certbot renew

???? 망했다 이글은 이제부터 오류 정정 글이다.
produced an unexpected error: The manual plugin is not working; there may be problems with your existing configuration.
수동 플러그인이 작동하지 않아… 서… 쉿…
이 renew명령은 자동화 (예 : cronjob에 배치) 전용이므로 대화식으로 실행해야하는 플러그인은 지원하지 않는다고 한다.
그래서 수동 플러그인으로 작성된 인증서를 갱신할건데, 원래 명령을 다시 실행하는 방식으로 시도하곘다.
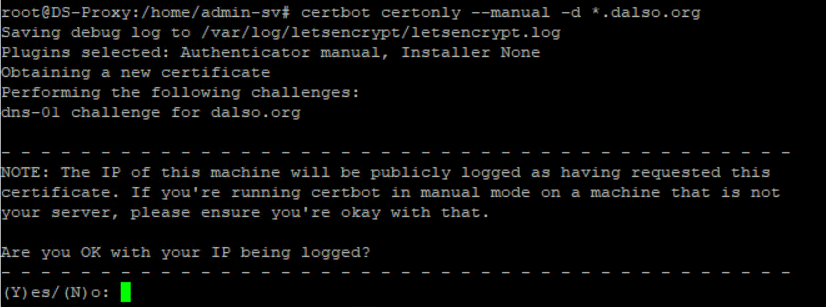
certbot certonly –manual -d *.dalso.org

수정하고는 적용이 될때까지 시간이 조금 필요하다. 인내심을 갖자.

An unexpected error occurred:
There were too many requests of a given type :: Error creating new order :: too many failed authorizations recently: see https://letsencrypt.org/docs/rate-limits/
들어가서 확인해보면 시간당 5 개의 실패 실패 검증 제한. 이 걸려있음을 확인할 수 있다.
짧은시간에 많이 시도해서 그럼..ㅠ

이제 저 경로에 있는 키로 사용하면 된다.
vi /etc/nginx/sites-available/ 폴더에있는 사이트들의 SSL경로를 바꿔주고 nginx 를 restart 하고나서 웹사이트를 접속하면
ODROID XU4, UBUNTU MATE 자동 로그인
ODROID XU 에 LINUX ( UBUNTU Mate) 설치후에 Network SSH 로 제어해야하는데 매번 로그인을 직접해줘야하는 불편함이 있다.
그래서 자동로그인하는 방법을 공유한다.
Shell/Terminer 을 통해 아래 파일을 추가 or 수정
vim /usr/share/lightdm/lightdm.conf.d/60-lightdm-gtk-greeter.confvi editor 를 사용하여 아래 구문을 추가
[SeatDefaults]
greeter-session=lightdm-gtk-greeter
autologin-user=odroid
Reboot 하면 자동로그인을 확인할 수 있다.
Read More